Find a Mold Specialist Now
Click or Call, Toll-Free 24/7
mold in walls
Mold in walls is a particularly tricky problem. It can grow there for quite some time before you even realize it's there, spreading unseen inside the walls. The mold in your walls may not stay in the walls, either. It can spread throughout your home. And even if you're not aware of its presence, mold inside walls can cause health problems.
How Do You Know if There is Mold in Walls?
If you've had significant water damage, like a broken pipe inside a wall or flooding in your home, there is a possibility of mold growing within the walls. In such cases, you're going to need to remove and replace the drywall anyway, so while you're at it, it's easy enough to check for mold inside the walls.
If you see mold on the surface of a wall, it is possible there is mold inside the walls, as well. Because it is difficult or impossible to remove mold from porous materials like drywall, you will need to remove and replace the moldy section of drywall. That will make it easy to check for mold inside the wall. Use a small mirror with a long handle and a flashlight to look inside the walls for mold.
Yet another sign of mold growing unseen inside the walls is a musty odor. There are other, easier places to search for hidden mold if you smell that characteristic musty odor that indicates mold is present somewhere, but if you've looked elsewhere and can't find it, you may need to check inside the walls.
If you're not sure whether or not you need to check inside the walls, you can consult with a mold removal professional for advice.
How Do You Check for Mold inside Your Walls?
To check inside your walls for mold, you'll need to carefully cut out six-inch squares of drywall, remove the cut-out squares, and use a long-handled mirror and flashlight to look inside for mold. It is recommended that you check in several places, since you might miss small amounts of mold if you only look inside the wall in one spot. The U.S. Environmental Protection Agency (EPA) recommends hiring a professional to help you look for hidden mold, including mold in walls, since the process can potentially spread mold throughout the room and expose you to harmful mold spores, if in fact it turns out there is mold inside the wall.
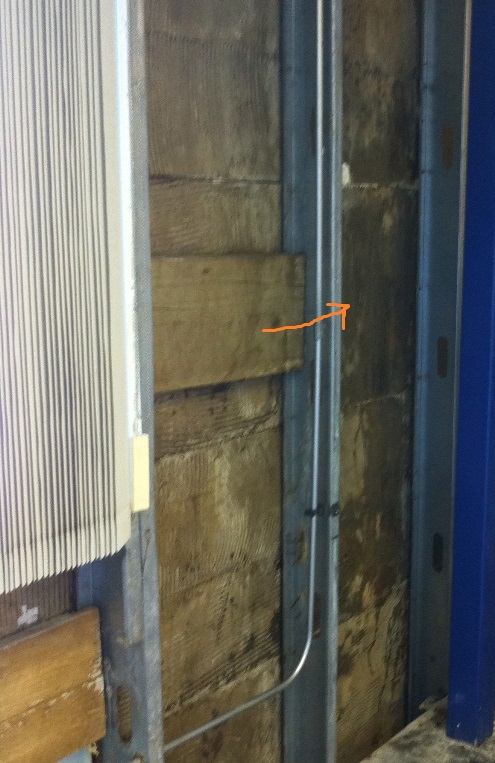
 Mold in walls found under sheetrock
How Do You Remove Mold Inside Walls?
Before attempting to remove mold in walls remember that these procedures are to be performed inside a contained area while wearing personal protective equipment and operating negative air filtration equipment.
If mold is growing on the back of drywall, the drywall must be removed and replaced. Any insulation in the wall should be removed and replaced. Moldy materials should be double bagged in heavy plastic trash bags before you carry them through the house for disposal, to prevent the inadvertent spread of mold throughout the home in the process.
After sheetrock walls and/or ceilings are removed, the exposed studs and joists and the surfaces between the studs and joists need to be HEPA vacuumed to remove all of the settled dust deposits from these surfaces, as these deposits are likely to contain elevated levels of mold and bacteria. The same holds true for floor joists when wood floors are removed during a mold remediation project.
After the HEPA vacuuming work is performed, studs, joist, and surfaces in between need to be disinfected. Any cleaning product that contains an anti-microbial substance is adequate to disinfect these surfaces. Foster 40-80 is an excellent product, which we recommend. Metal studs and sills can be wiped with a cloth or paper towels dampened with the product. For large areas, you can use a one-gallon garden-type pump sprayer containing the disinfectant and spray the surfaces. Masonry surfaces, such as concrete, bricks, tiles, cinder blocks, etc, and wood and vinyl floors are also disinfected with disinfectants when masonry materials are associated with a mold remediation project or are located inside a contained work area.
After surfaces are disinfected and dry, any wood surfaces displaying residual mold should be encapsulated with an encapsulant coating. Encapsulant coatings are similar to paints, but they contain chemicals that have fungicidal properties, which kill mold. Additionally, when the encapsulant paint dries, the coating hardens and locks down any mold onto the surface of the wood so that mold spores cannot become airborne. Remember, dead or alive, mold is equally allergenic, so it is important to encapsulate any residual mold. Encapsulant coatings are used on wood, provided that the wood is not wet. Otherwise, you have to wait until the wood is dry before using the coating. The encapsulants can be applied to wood surfaces using a brush or a roller. For large areas of wood containing residual mold, high-pressure airless sprayers are used, but these sprayers are expensive to purchase. A popular and effective encapsulant is Caliwel paint, which contains calcium hydroxide, a chemical that gives the paint anti-fungal (fungicidal) properties. Surfaces to be encapsulated must first be primed with Caliwel primer before being encapsulated. Another common encapsulant is Foster 40-50, which is white, and Foster 40-51, which is clear. Both the Caliwel product and the Foster products can be applied with a brush, roller, or high- pressure, airless sprayer.
For Help Removing Mold in Walls
If you need help removing mold in your walls, or if you'd just like some advice about the mold removal process, we suggest scheduling a free consultation in your home with a mold removal professional. There's no obligation on your part, so even if you opt to handle the mold removal job yourself, you can benefit from some free professional guidance. To find qualified mold removal professionals offering free consultations in your area, you can follow the link.
Return From Mold In Walls To Our Moldy Drywall Page
Reference:
Privacy Policy Terms and Conditions Accessibility Do Not Sell My Information Disclaimer Contact Us


